跳到主要内容

48 篇博文 含有标签「操作系统与命令」

操作系统和命令行相关知识

查看所有标签

关闭恢复 Ubuntu GUI

· 阅读需 1 分钟
素明诚
Full stack development

临时关闭 GUI​

如果你只是想临时关闭 GUI,可以通过以下命令停止显示管理器服务(例如 GDM、LightDM 等)。这会将你带回到命令行界面,而不会在下次启动时影响 GUI。

首先,需要确定你的 Ubuntu 使用的是哪种显示管理器。常见的有gdm3(GNOME Display Manager)和lightdm。

systemctl status gdm3

或者

systemctl status lightdm

停止显示管理器服务。例如,如果你的系统使用gdm3,可以使用以下命令

sudo systemctl stop gdm3

如果是lightdm,使用

sudo systemctl stop lightdm

永久不启动 GUI​

如果你想让 Ubuntu 系统永久不启动 GUI,只使用命令行界面,可以禁用显示管理器服务的自动启动。

sudo systemctl disable gdm3

或者

sudo systemctl disable lightdm

重启你的电脑

sudo reboot

系统将以命令行模式重新启动。

恢复 GUI​

如果你想恢复 GUI,可以通过以下命令恢复默认的图形界面启动目标

sudo systemctl set-default graphical.target
sudo reboot

Linux pip 配置国内源

· 阅读需 1 分钟
素明诚
Full stack development

国内镜像源​

清华大学https://pypi.tuna.tsinghua.edu.cn/simple

阿里云https://mirrors.aliyun.com/pypi/simple/

中国科技大学https://pypi.mirrors.ustc.edu.cn/simple/

豆瓣https://pypi.douban.com/simple/

你可以通过修改 pip 的配置文件或在命令行中指定使用这些镜像。例如,要使用清华大学的镜像,可以在 pip 命令中这样指定

pip install -r requirements.txt -i https://pypi.tuna.tsinghua.edu.cn/simple

配置 pip 的默认源​

对于 Unix/Linux/macOS (pip.conf):

[global]
index-url = https://pypi.tuna.tsinghua.edu.cn/simple

对于 Windows (pip.ini):

[global]
index-url = https://pypi.tuna.tsinghua.edu.cn/simple

检查是否配置成功​

使用 pip config list 命令来查看当前的配置是否已经更新。这个命令会显示所有 pip 的配置,包括你设置的源。

c627f8b57741e662cac6f375b8185068

Linux 上检查

Windows pip 配置国内源

· 阅读需 2 分钟
素明诚
Full stack development

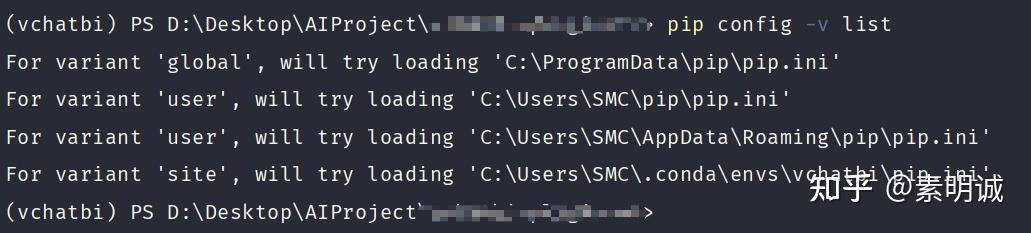
查看当前 pip 位置​

pip config -v list

9d4a61ae89ba84e0048c931888668c08## 配置文件说明

全局配置

C:\ProgramData\pip\pip.ini
这是系统级别的配置,对所有用户有效。

用户配置

C:\Users\SMC\pip\pip.ini
C:\Users\SMC\AppData\Roaming\pip\pip.ini
这些是当前用户的配置文件,只对当前用户有效。

虚拟环境配置

C:\Users\SMC\.conda\envs\vchatbi\pip.ini
这是特定于 `vchatbi` 虚拟环境的配置,只在这个虚拟环境中有效。

编辑配置文件​

你可以选择编辑上述任一配置文件来设置 pip 源。根据你的需要,选择合适的文件进行编辑

如果你希望改变的设置对所有用户都有效,编辑全局配置文件。

如果只希望影响当前用户,编辑用户配置文件。

如果只想影响特定虚拟环境中的 pip 行为,编辑虚拟环境的配置文件。

假设你想要修改用户级别的配置文件 C:\Users\SMC\AppData\Roaming\pip\pip.ini,添加或修改内容如下

[global]
index-url = https://pypi.tuna.tsinghua.edu.cn/simple

常用源​

清华大学 Tuna 镜像源

https://pypi.tuna.tsinghua.edu.cn/simple

阿里云 PyPI 镜像

https://mirrors.aliyun.com/pypi/simple/

中国科技大学

https://pypi.mirrors.ustc.edu.cn/simple/

华为云

https://mirrors.huaweicloud.com/repository/pypi/simple

腾讯云

http://mirrors.cloud.tencent.com/pypi/simple

网易开源镜像站

http://mirrors.163.com/pypi/simple/

豆瓣源

http://pypi.douban.com/simple/

Ubuntu 解决 fc-cache 命令缺失导致的 initramfs-tools 更新失败 的问题

· 阅读需 4 分钟
素明诚
Full stack development

错误内容​

E: /usr/share/initramfs-tools/hooks/plymouth failed with return 127.
update-initramfs: failed for /boot/initrd.img-... with 127.
dpkg: error processing package initramfs-tools (--configure):
installed initramfs-tools package post-installation script subprocess returned error exit status 127

错误代码 127 表示命令未找到(command not found)。

initramfs-tools 的 plymouth 钩子脚本在更新 initramfs 镜像时,需要调用 fc-cache 命令。

尽管 fontconfig 软件包已安装,但 fc-cache 命令缺失,可能是由于软件包损坏、文件系统问题或磁盘空间不足导致的。

排查步骤​

步骤 1:更新软件包列表​

首先,更新您的软件包列表以确保获取最新的软件包信息。

sudo apt-get update

步骤 2:强制重新安装 fontconfig 及其相关软件包​

强制重新安装 fontconfig 及其相关的软件包,包括 libfontconfig1 和 fontconfig-config。

sudo apt-get install --reinstall fontconfig fontconfig-config libfontconfig1

注意: 请仔细观察重新安装过程中的任何错误信息。如果出现错误,请记录下来。

步骤 3:验证 fc-cache 是否存在​

重新安装后,检查 fc-cache 是否已安装。

which fc-cache

预期结果: 应该输出 /usr/bin/fc-cache。如果没有输出,表示 fc-cache 仍然缺失。

步骤 4:检查 fc-cache 的可执行权限​

查看 fc-cache 的文件权限是否正确。

ls -l /usr/bin/fc-cache

预期结果: 您应该看到文件存在,并且具有可执行权限(-rwxr-xr-x)。

步骤 5:测试 fc-cache 命令​

尝试运行 fc-cache,以确保它可以正常工作。

/usr/bin/fc-cache --version

预期结果: 显示 fontconfig 的版本信息。

步骤 6:完成未完成的软件包配置​

由于之前的错误涉及到 initramfs-tools 未完全安装或配置,运行以下命令:

sudo dpkg --configure -a

这将尝试完成任何未完成的软件包配置。

步骤 7:更新 initramfs​

尝试重新生成 initramfs,看看错误是否仍然存在。

sudo update-initramfs -u

步骤 8:如果问题仍然存在,检查软件包完整性​

如果 fc-cache 仍然缺失,可能是软件包数据库或 fontconfig 软件包本身已损坏。我们可以尝试清理软件包缓存并重新下载软件包。

sudo apt-get clean
sudo apt-get update
sudo apt-get install --reinstall fontconfig fontconfig-config libfontconfig1

步骤 9:检查磁盘空间​

确保系统磁盘有足够的可用空间,特别是 /usr 所在的分区。

df -h

如果空间不足,可能导致软件包无法正确安装。

步骤 10:检查文件系统是否存在损坏​

如果怀疑文件系统可能损坏,可以尝试在下次重启时运行文件系统检查。

sudo touch /forcefsck

然后重启系统,系统会在启动时自动检查文件系统。

步骤 11:查看 fontconfig 软件包的文件列表​

检查 fontconfig 软件包应包含哪些文件,并验证它们是否存在。

dpkg -L fontconfig

查看输出,确认 /usr/bin/fc-cache 是否在列表中。

步骤 12:尝试从 DEB 文件手动安装 fontconfig​

如果问题仍未解决,可以尝试手动下载并安装 fontconfig 软件包。

sudo apt-get download fontconfig
sudo dpkg -i --force-all fontconfig_*.deb

注意: 请确保替换 fontconfig_*.deb 为实际下载的文件名。

步骤 13:检查 fontconfig 依赖的库​

查看 fc-cache 依赖的库,确保它们都存在。

ldd /usr/bin/fc-cache

如果有任何库显示为 not found,则需要重新安装相应的库。

步骤 14:重新安装相关的依赖库​

如果发现缺少某些库,例如 libfontconfig.so.1,请重新安装相关的库。

sudo apt-get install --reinstall libfontconfig1

步骤 15:尝试移除并重新安装 fontconfig​

警告: 这可能会移除依赖于 fontconfig 的其他软件包,请务必谨慎。

sudo apt-get remove --purge fontconfig
sudo apt-get install fontconfig

在执行此操作前,您可以检查哪些软件包依赖于 fontconfig:

apt-cache rdepends fontconfig

步骤 16:再次验证 fc-cache​

重复 步骤 3 和 步骤 5,确认 fc-cache 已正确安装并可执行。

步骤 17:重新配置并更新 initramfs​

sudo dpkg --configure -a
sudo update-initramfs -u

如果在上述所有步骤后问题仍未解决,我们可以考虑以下临时解决方案:

临时解决方案:禁用 plymouth 钩子​

注意: 这只是一个临时的解决方案,可能会影响系统的启动画面。

步骤 1:重命名 plymouth 钩子脚本

sudo mv /usr/share/initramfs-tools/hooks/plymouth /usr/share/initramfs-tools/hooks/plymouth.bak

步骤 2:重新配置软件包并更新 initramfs

sudo dpkg --configure -a
sudo update-initramfs -u

步骤 3:继续软件包安装或更新
apt install git

Ubuntu 上安装和配置 Docker

· 阅读需 2 分钟
素明诚
Full stack development

一、更新软件源​

备份现有的 sources.list 文件并替换为清华大学的镜像源

sudo cp /etc/apt/sources.list /etc/apt/sources.list.bak
​
sudo tee /etc/apt/sources.list > /dev/null <<EOL
deb https://mirrors.tuna.tsinghua.edu.cn/ubuntu/ jammy main restricted universe multiverse
deb https://mirrors.tuna.tsinghua.edu.cn/ubuntu/ jammy-updates main restricted universe multiverse
deb https://mirrors.tuna.tsinghua.edu.cn/ubuntu/ jammy-backports main restricted universe multiverse
deb https://mirrors.tuna.tsinghua.edu.cn/ubuntu/ jammy-security main restricted universe multiverse
EOL
​
echo "已备份原始 sources.list 文件为 sources.list.bak,并写入新的 sources.list。"
​
sudo apt-get update

二、安装必要依赖​

sudo apt-get install -y apt-transport-https ca-certificates curl gnupg lsb-release

三、添加 Docker 的 GPG 密钥和仓库​

sudo install -m 0755 -d /etc/apt/keyrings
​
curl -fsSL https://mirrors.tuna.tsinghua.edu.cn/docker-ce/linux/ubuntu/gpg | \
sudo gpg --dearmor -o /etc/apt/keyrings/docker.gpg
​
sudo chmod a+r /etc/apt/keyrings/docker.gpg
​
echo \
"deb [arch=$(dpkg --print-architecture) signed-by=/etc/apt/keyrings/docker.gpg] \
https://mirrors.tuna.tsinghua.edu.cn/docker-ce/linux/ubuntu \
$(lsb_release -cs) stable" | \
sudo tee /etc/apt/sources.list.d/docker.list > /dev/null
​
sudo apt-get update

四、安装 Docker​

sudo apt-get install -y docker-ce docker-ce-cli containerd.io \
docker-buildx-plugin docker-compose-plugin

五、验证安装​

docker info

如果安装成功,您将看到 Docker 的详细信息。

六、配置 Docker 日志和其他选项​

创建或修改 /etc/docker/daemon.json 文件

sudo tee /etc/docker/daemon.json > /dev/null <<EOF
{
"insecure-registries": ["0.0.0.0/0"],
"live-restore": true,
"log-driver": "json-file",
"log-opts": {
"max-size": "50m",
"max-file": "3"
},
"default-address-pools": [
{
"base": "172.30.0.0/16",
"size": 24
},
{
"base": "172.31.0.0/16",
"size": 24
}
]
}
EOF

重新加载并重启 Docker 服务

sudo systemctl daemon-reload
sudo systemctl restart docker
sudo systemctl enable docker

再次验证

docker info

确保配置已生效。

七、安装 Docker Compose​

sudo wget https://github.com/docker/compose/releases/download/v2.27.2/docker-compose-linux-x86_64 \
-O /usr/local/bin/docker-compose
​
sudo chmod +x /usr/local/bin/docker-compose

八、更新 Hosts 文件​

echo -e "59.151.19.44\tmodel.vnet.com\n172.22.220.40\tmodel.vnet.com" | sudo tee -a /etc/hosts

这样就完成了 Docker 的安装和基本配置。

Windows10 安装 Miniconda

· 阅读需 1 分钟
素明诚
Full stack development

下载 miniconda​

Installing Miniconda## 添加环境变量

手动添加 Miniconda 到 PATH

1. 打开环境变量设置

按下 Win + X,选择“系统”,然后点击“高级系统设置”。

或者通过“控制面板” > “系统和安全” > “系统” > “高级系统设置”进入。

2. 编辑环境变量

点击“环境变量”按钮。

在“用户变量”或“系统变量”中,找到并选中 Path,然后点击“编辑”。

3. 添加 Miniconda 路径

点击“新建”,添加以下路径(根据您的实际安装路径):

C:\Users\<username>\Miniconda3

C:\Users\<username>\Miniconda3\Scripts

C:\Users\<username>\Miniconda3\Library\bin

注意:请将 <username> 替换为您的实际用户名。

4. 保存更改

  • 点击“确定”保存环境变量设置。
  • 关闭所有对话框。

5. 重启 PowerShell

  • 关闭并重新打开 PowerShell,以使环境变量更改生效。

验证​

conda --version

systemd 常用命令

· 阅读需 1 分钟
素明诚
Full stack development

systemctl 是用于控制 systemd 系统和服务管理器的命令行工具。systemd 是现代 Linux 发行版中常用的初始化系统和服务管理器,负责在系统启动时启动和管理系统服务。

常用命令​

启动服务

sudo systemctl start <服务名>

停止服务

sudo systemctl stop <服务名>

重启服务

sudo systemctl restart <服务名>

查看服务状态

sudo systemctl status <服务名>

启用服务(开机自启)

sudo systemctl enable <服务名>

禁用服务(取消开机自启)

sudo systemctl disable <服务名>

查看所有正在运行的服务

systemctl list-units --type=service --state=running

查看所有服务(包括未运行的)

systemctl list-unit-files --type=service

示例​

启动 Apache 服务

sudo systemctl start apache2

查看 Apache 服务状态

sudo systemctl status apache2

设置 Apache 开机自启

sudo systemctl enable apache2

停止 Apache 服务

sudo systemctl stop apache2

常用的 journalctl 命令总结

· 阅读需 2 分钟
素明诚
Full stack development

journalctl 是一个用于查看由 systemd 收集的系统和服务日志的工具。

1. 查看所有日志​

journalctl

2. 实时查看日志(类似于 tail -f)​

journalctl -f

3. 按服务查看日志​

查看特定服务的日志

journalctl -u <服务名>

例如,查看 nginx 服务的日志

journalctl -u nginx

实时查看特定服务的日志

journalctl -u <服务名> -f

4. 按时间过滤日志​

查看自某时间以来的日志

journalctl --since "YYYY-MM-DD HH:MM:SS"

例如,查看今天的日志

journalctl --since today

查看某时间范围内的日志

journalctl --since "YYYY-MM-DD" --until "YYYY-MM-DD"

5. 按引导(启动)次数查看日志​

查看当前引导(启动)以来的日志

journalctl -b

查看上一次引导的日志

journalctl -b -1

列出所有引导记录

journalctl --list-boots

6. 按优先级(日志级别)过滤​

仅显示错误级别及以上的日志

journalctl -p err

指定优先级范围

journalctl -p 0..3

优先级等级(从高到低)

优先级级别含义
0emerg紧急
1alert警报
2crit严重
3err错误
4warning警告
5notice通知
6info信息
7debug调试

7. 搜索日志内容​

按关键词搜索日志

journalctl | grep "关键词"

使用 -g 选项搜索

journalctl -g "关键词"

8. 按进程或用户过滤​

按进程 ID(PID)过滤

journalctl _PID=1234

按用户 ID(UID)过滤

journalctl _UID=1000

9. 查看内核日志​

journalctl -k

10. 反向排序日志(最新的在前)​

journalctl -r

11. 查看磁盘日志占用情况​

journalctl --disk-usage

12. 清理日志​

保留最近 7 天的日志

sudo journalctl --vacuum-time=7d

将日志总大小限制为 1GB

sudo journalctl --vacuum-size=1G

13. 不使用分页器显示​

journalctl --no-pager

14. 指定输出格式​

详细模式

journalctl -o verbose

JSON 格式

journalctl -o json-pretty

15. 导出和导入日志​

导出日志

journalctl --since "YYYY-MM-DD" --until "YYYY-MM-DD" --output=export > logs.bin

导入日志

journalctl --file=logs.bin

Windows 上为 WSL2 设置端口转发实现局域网访问

· 阅读需 2 分钟
素明诚
Full stack development

查看 WSL 的 IP​

 ✘⚡ root@DESKTOP-AETE0Q9  /home/cc  hostname -I
172.19.221.125 172.20.0.1 172.17.0.1

172.19.221.125 就是 WSL 的 IP,一会转发到这个 IP

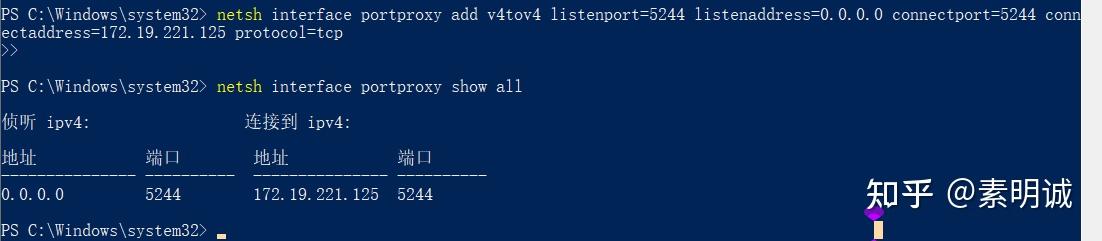
在 windows 上进行端口转发​

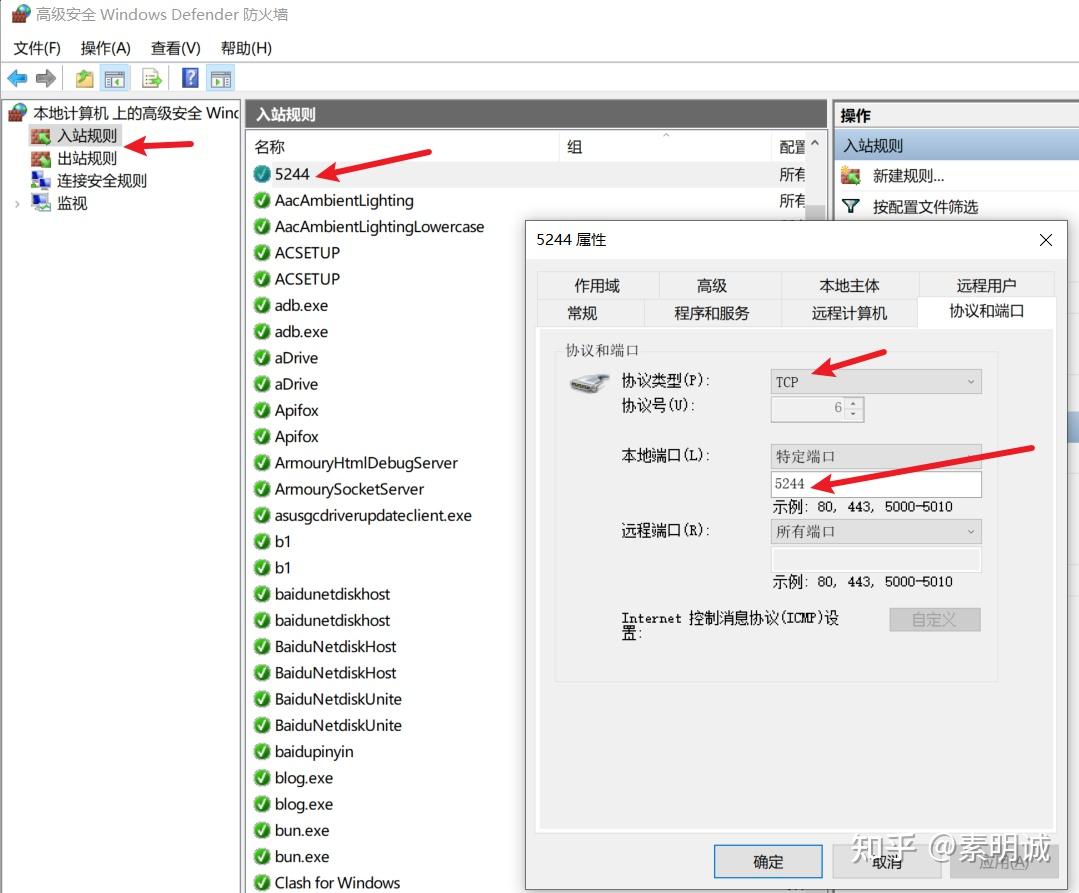
netsh interface portproxy add v4tov4 listenport=5244 listenaddress=0.0.0.0 connectport=5244 connectaddress=172.19.221.125 protocol=tcp

ec7fc11bc87e2828fb7ff8ab4bd099cd### 参数说明

add v4tov4: 指示 netsh 添加一个 IPv4 到 IPv4 的端口转发规则。

listenport=5244: 设置侦听端口,即外部设备将连接到这个端口。在这个例子中,Windows 机器将监听在端口 5244 上的所有入站连接。

listenaddress=0.0.0.0: 设置侦听地址。特殊的 IP 地址 0.0.0.0 表示接收通过任何网络接口到达该端口的数据,这使得从任何网络接入都被接受。

connectport=5244: 设置连接端口,即当数据到达侦听端口时,数据将被转发到此端口。在此例中,转发的目标端口同样是 5244。

connectaddress=172.19.221.125: 设置连接地址,即数据将被转发到这个 IP 地址。这通常是内部网络中的一个设备(如 WSL2 实例)的地址。

protocol=tcp: 指定使用 TCP 协议进行端口转发。这意味着规则适用于 TCP 连接,这是大多数网络应用程序(如 HTTP 服务器、数据库等)的常用协议。

windows 上添加入站规则​

0ceb5e05e32ffae497a8a2c71fcc53e7## 在 windows 上进行测试
0c145f89f470e88ed679e632d09dc32d

可以访问了,局域网也没问题